Magento 2 Popup Extension
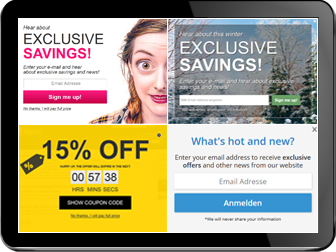
Advanced Popup extension for improving conversion. Different styles and templates, newsletter, exit intent, A B testing and more.
Create your first popup
After you installed our extension (follow our installation guide for the installation), you will see inside admin new section Magebird Popup under CONTENT. To create a new popup from scratch click the "Add New Popup" button. If you want to use one of the predefined templates, click the "Popup templates" button and select from the list your favorite template. A page with a popup editor will show up with the popup configuration options.
How to create responsive newsletter popup?
Click a widget icon in your editor and select option Popup Newsletters. For a width unit select Percentage (%) and fill out other data. Then select the Precentage (%) unit also for your popup (under "Popup width unit"). A new field "Popup max width" will show up when you select the % unit. It is recommended to set max width so your popup won't be too wide on very wide screens. You can select this popup to be shown only on mobile devices using "Devices" field under "Settings".

How can I translate the newsletter widget?
A translation file is located in /app/code/Magebird/Popup/i18n/en_US.csv. You can create new translation file for your language (e.g.:de_DE.csv) and copy the content there and translate it. The CSV file contains the translation strings in the key-value pair format. First key-value is original, second key-value pair is your translation.
Example:
"Enter Your Email","Your translation"
After you change csv file you need to clear Magento translations cache and click 'Clear popup cache' button. The button is located inside Content->Magebird popup.
A B testing
To perform A B testing create 2 or more popups. Both popups should have the same value for field "Cookie/popup id". To find the field "Cookie/popup id" click tab "Settings" on the left. When 2 or more popups share the same cookie id it will show by random just one of them. When user closes any of them, it won't show again any popup with the same cookie id. You can create as many popups with the same cookie id as you want.
Using Countdown timer and time limited coupon codes
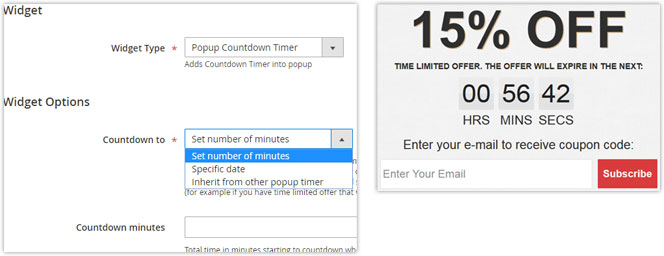
The extension gives you option to show time limited offers in popups with a countdown counter inside. When you open the countdown timer widget, you will find different options. You can set a date for expiration or number of minutes. Field "On countdown action" is used if you want to close popup or show message when the counter goes to 0. There are 3 different templates you can use for the counter.
Does it work with fullpage cache?
It works with any cache extension.
How to show embed video?
In your popup editor click the html icon and paste the embed code.

How to use Mailchimp integration?
The extension gives you various integration Mailchimp options. You can send a subscriber's e-mail address to Magento newsletter list, only Mailchimp list or to both lists. For the Mailchimp you can set to use double opt-in or without.
First you need to enable Mailchimp integration and add Mailchimp Api Key. Go to Stores->Configuration->MAGEBIRD EXTENSIONS->Popup->Newsletter Services to add it. There you will see also some other basic settings. You can find your key at http://admin.mailchimp.com/account/api/.
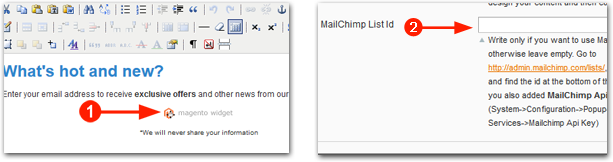
Next you need to add your Mailchimp list id. Each popup can have different list id. Double click to the widget icon. In Widget Insertion you will find MailChimp List Id field at the end of the form with instructions where you can find list id.
Adding First and Last name into Mailchimp:
If you want to add first and last name into newsletter form and send it to Mailchimp, you need to make a tiny modification inside newsletter template. Open file app/code/Magebird/Popup/view/frontend/template/widget/newsletter/1.phtml (replace 1.phtml with your template number you selected inside newsletter widget). After line <input type="text"... put this:
<input type="text" placeholder="<?php echo __('First name')?>" name="first_name" />
<input type="text" placeholder="<?php echo __('Last name')?>" name="last_name" />
After you save the file, you need to clear Popup cache. Go to Content->Magebird Popup and click 'Clear Popup Cache' button. First and Last name will now appear inside newsletter form and they will be sent to Mailchimp.
Adding user to Mailchimp segment groups:
If you want user to select user group inside newsletter popup and send it to Mailchimp, you need to make a tiny modification inside newsletter template. Open file app/code/Magebird/Popup/view/frontend/template/widget/newsletter/1.phtml (replace 1.phtml with your template number you selected inside newsletter widget). After line <input type="text"... put this:
<input type="hidden" name="groupName" value="A name of your group goes here" />
<input style="width:auto;height:auto" type="radio" name="groupValue" value="group option 1">Male<br>
<input style="width:auto;height:auto" type="radio" name="groupValue" value="group option 2">Female<br>
<input style="width:auto;height:auto" type="radio" name="groupValue" value="group option 3">Option 3<br>
You need to replace group options with your actuall group option values defined inside Mailchimp. Please contact us if you need help with this step.
Show popup when somebody clicks a link or on hover
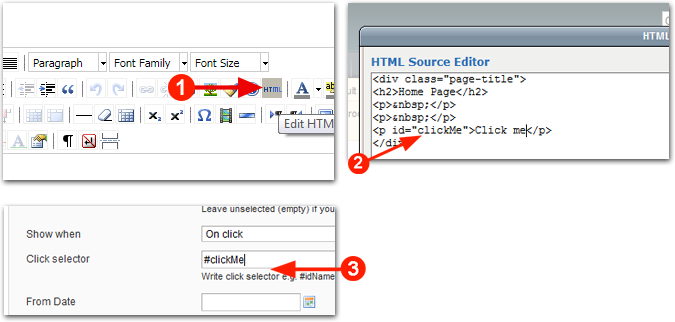
We will take for example the cms page "Home page". Let's say you want to show a popup when somebody clicks "Click me" text. First you need to create an element with id "Click me". In your cms editor click the html icon and add the element with that id. When the element is created, you can attach on click event to it in your popup. In popup editor set "Show when" field to "On click". In "Click selector" write "#clickMe". If you want to show on hover you choose option On hover instead of On click. If you already have id or class in your html code you don't need to use cms editor.
Using popup to trigger another popup on click:
You can use also popup to trigger another popup. First create a small popup. Click 'Show/Hide Editor' button and put an unique id to element that is around the popup content. For example you can put id="popupTrigger". You can also find example for this popup inside predefined templates under name 'Popup trigger', this template has id already inserted. Next click to tab Settings and change 'Stop further popups' to 'No'. You will probably want to set 'Overlay Background' to 'No background, Popup fixed positioned' (click tab Appearance to find this field). Save this popup and then create another popup.
For second popup you change field 'Show when' to 'On click'. New field 'Click selector' will show up. There you put the same id you inserted inside the previous popup inside editor. In our example this would be '#popupTrigger'. Next you click the Settings tab and choose inside field 'Stop further popups' option 'No' again also for this popup.
Now both popups will be loaded in your site. The first one (the trigger popup) will show up when a page is loaded. The second popup will show up when a visitor click to first popup.
Show popup when a visitor attempts to leave your site
You can show popup to visitors when visitor's cursor leaves browser window. This is called exit intent popup. To make the exit intent popup find field "Show when" (under the tab General information) and change the value to "Exit intent".
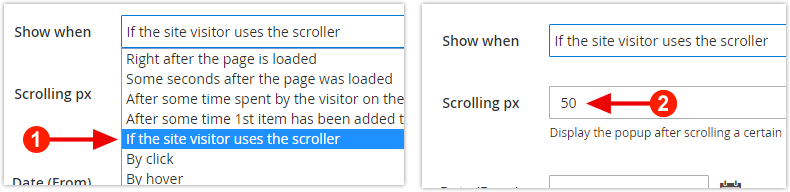
Show popup when visitor uses scroller, show after 3 seconds
Popup after an user uses scroller or after 3 seconds is a good method to keep your bounce rate low. To show popup after user uses scroller you set field "Show when" to "If the site visitor uses the scroller". New field "Scrolling px" will show up where you can define after scrolling how many px from the top of the page should popup show up.
To show popup after 3 seconds, you need to select option "Define seconds after page loads". New field "Seconds" will show up where you can define seconds.
Why is my popup not showing up?
The following are the most common reasons:
-Check From Date and To Date.
-Check if status in Enabled.
-Change Cookie/popup id inside Settings. It could be that the popup cookie is already stored in your browser if "Showing Frequency" was set to other than "Show every time" in the past. Be aware that changing cookie/popup id will force to show popup once again also to visitors who already closed it.
How to use dynamic coupons inside popup
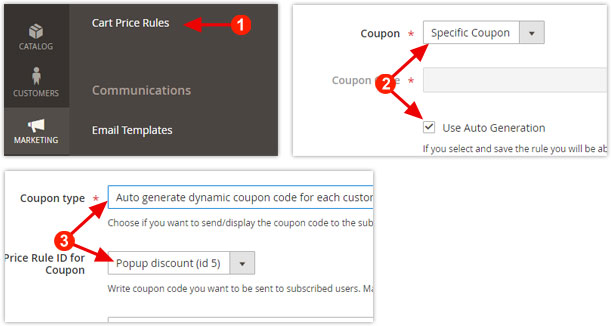
To use dynamic coupons inside popup you need to create first at least one Shopping Cart Price Rule with "Use Auto Generation" checked on (if not added already).
In your admin go to Marketing->Cart Price Rules. Click Add New Rule button and you will come to page for adding new rule. In field Coupon choose "Specific coupon" and check "Use Auto Generation". Fill other necessary data and click Save button.
After that you can go back to your popup editor. Open Widget insertion again and select "Coupon type" to "Auto generate dynamic coupon code for each customer". In field "Shopping Cart Price Rule ID for Coupon" you can now select your newly added Shopping Cart Price Rule.
Showing multiple popups
In some cases you need to show more than just 1 popup per page view. Let's say you want to show 3 popups:
-Popup with newsletter on your page bottom when the page loads and you want to show it only once
-Video popup show every time when user clicks See video link.
-Popup with text show every time when user clicks Help? link.
First you create the Popup with newsletter. For this popup you set "Show when" to value "After page loads". Under Settings you set "Stop further popups" to "No" so it won't stop another 2 popups. Then you create another two popups. The second and the third popup should have in this case "Show when" set to "On click" (see above how to create the On Click popup). Under Settings you set option "Stop further popups" to "No" the same as for the first popup.
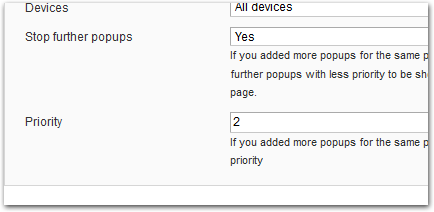
If you have also some other popups that apply to this page and you don't want to show them, the thing is a bit more complicated. In this case you need to use field "Priority". For the first and the second popup you set Priority to 1 and "Stop further popups" to "No". To third popup you set Priority 2 and "Stop further popups" to "Yes". All other popups should have "Priority" 3 or more. In this way it will load first the popup 1 and the popup 2. Then it will load the third popup. Because the popup 3 has rule "Stop further popups" set to "Yes" it won't show any further popups with less priority. You should apply "Stop further popups" to the popup that has also settings "Show every time". Otherwise that popup won't be loaded anymore once user closes it and therefore it won't force to stop further popups. Only popups that are loaded can stop further popups. If everything is too complicated please contact us and we will assist you.
How to call phtml template file inside popup?
Popup editor gives you option to include also phtml templates files inside. Let's say you create file filename.phtml inside folder app\code\Magebird\Popup\view\frontend\templates\yourfolder (or vendor\magebird\opup\view\frontend\templates\yourfolder). To this phtml template inside popup, insert this code:
{{block class="Magento\Framework\View\Element\Template" template="Magebird_Popup::yourfolder/filename.phtml"}}
You need to replace foldername/filename with yours.
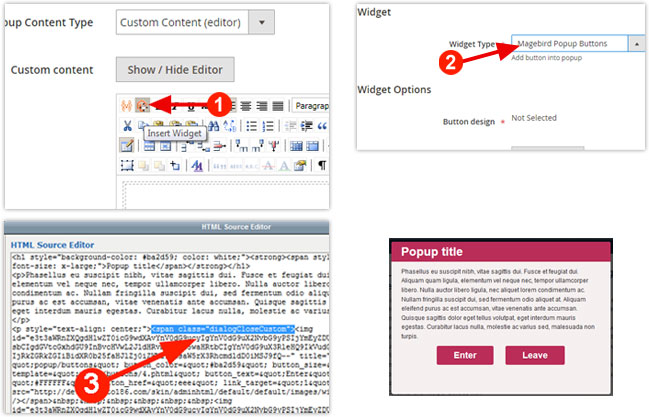
How to add your own close button or link?
To add your own close icon or text just wrap it into html element and add class "dialogCloseCustom" to that element. To add class to the element you need to click to html icon in popup editor. When element with class dialogCloseCustom is created and when user clicks that element, it will close the popup. 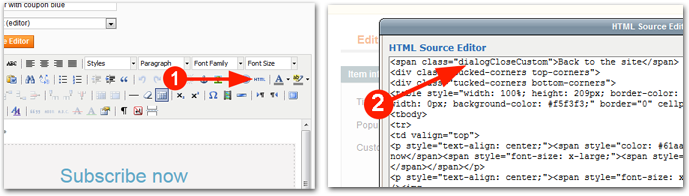
Email confirmation and coupon code
The extension gives you option to display coupon code inside popup after user subscribes newsletter. You can also send coupon code to e-mail or apply coupon to cart automatically. If your settings are set that user needs to confirm e-mail, you may not want to show coupon immediately after user types e-mail and clicks Subscribe button. In this case you can choose to display coupon only when user confirms subscription. Follow the following steps to change this:
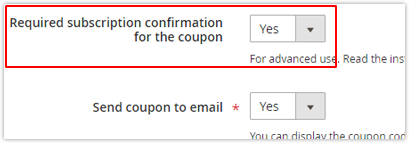
1. In newsletter widget, set "Subscription confirmation required for coupon?" to "Yes".
2. If you use Magento native newsletter, check your settings:
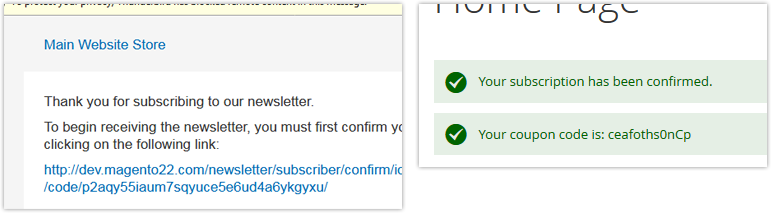
If you choose Subscription confirmation required for coupon, then coupon code will be shown once user clicks e-mail confirmation link.
IMPORTANT: Check what are your settings for Stores->CUSTOMERS->Newsletter->Need to Confirm. Don't select 'Subscription confirmation required for coupon?' to 'Yes' in Newsletter widget if you don't use e-mail confirmation. When user doesn't need to confirm subscription, he/she won't receive e-mail and thus won't get coupon code in such scenario. When you don't require e-mail confirmation, choose 'No' and display coupon inside field 'Text/content after subscribe'. On the other hand don't display coupon inside field 'Text/content after subscribe' if you chose 'Subscription confirmation required for coupon?' to 'Yes' because you want user to confirm subscription first.
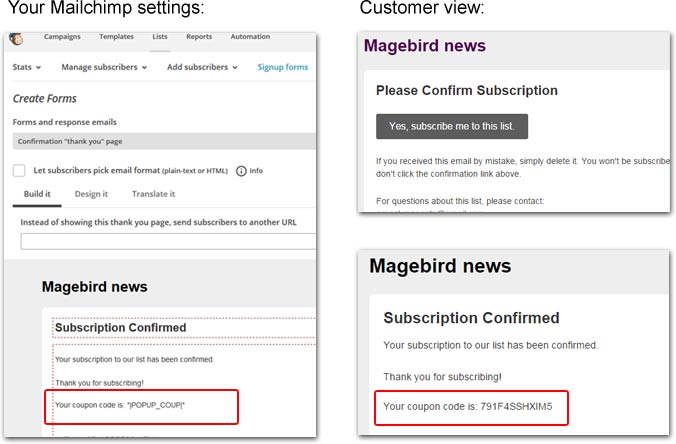
3. If you use Mailchimp put new tag into Thank you page
New merge tag with name POPUP_COUP will be created inside Mailchimp list. When user subscribes, it will save coupon into this tag. To show coupon to user, you need to modify Thank you page!
1) Navigate to the Lists page.
2) Click Signup forms and then General forms.
3) Under 'Forms and response emails' choose 'Confirmation Thank you page'.
4) Insert POPUP_COUP tag inside content. For example you can insert this: Your coupon code is: *|POPUP_COUP|*
Build "Age verification" or "Enter Agreement" Popup
First you need to set popup to be shown until user closes it (Settings->Showing Frequency). The trick is that you don't show close icon (Appearance & css->Close icon style->Don't show close icon) and in Settings you set "Close when click outside popup" to "No". You put two buttons or links. You can use Popup buttons widget or you can create own. One button is Leave the site. Another button or link is "Enter" button. You need to put "Enter" button within element with class dialogCloseCustom (see the below image). In this way the only way to close popup will be to click Enter button. Until user clicks this button, popup will always show up and user can not see the page. When user clicks this button it will save cookie and popup won't be shown again.
Example for this popup is in your templates. In your templates find popup "Popup with red header". If you have any problems please contact our supper responsive support.
Using images and other design tips
Our Popup extension gives you free hands to design any popup you want. The easiest way is to use existing templates which you can modify.
Change background color:
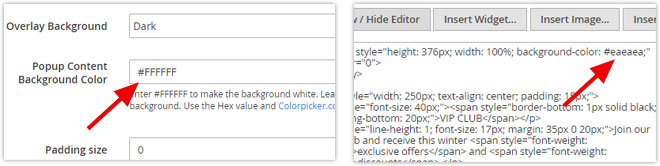
In most cases background color is set inside field "Popup Content Background Color" inside tab "Appearance". In additional, some advance popup templates use inline css style rule to set background color. If you don't see any affect when you change color inside field "Popup Content Background Color", then you need to change it inside editor. Click "Show / Hide Editor" button and html code will appear. Find code background-color: #eaeaea and put your color. Color #eaeaea is just example, you will see different color, so you need to search just for "background-color:" and put your color instead of #eaeaea. You need to use hex value. To get hex value of color, you can use colorpicker.com. For example, hex code for color white is #ffffff, hex code #eaeaea represents mild silver and so on. If you need help with this step you can contact us and we will help you.
Change button color:
Click widget icon. Widget options will show up and there you will see field Button color.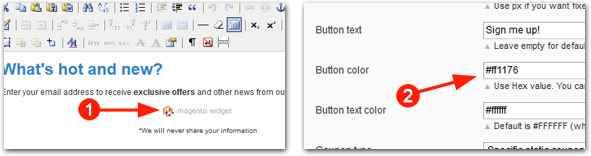
Change image:
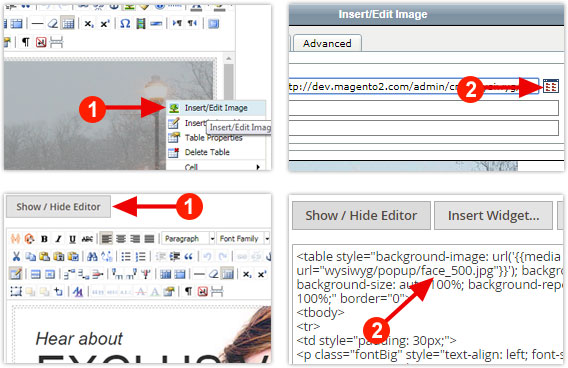
Some popup templates use images. Normally it is easy to replace image. Make right click to the image. Then select "Insert/Edit Image". Then click Browse icon and Image uploader will show up. It is recommended to upload image with the same dimensions as the previous image to keep the popup layout. In some advanced popup templates this method won't work because there are some other elements above image. In this case you need to click "Show / Hide Editor" button and html code will appear. Find code background-image: url('https://www.magebird.com/media/wysiwyg/popup/face_500.jpg'). Image name face_500.jpg is just example, you will see different image name. Then replace face_500.jpg with your image. Now you just need to upload image. Image must be uploaded to folder pub/media/wysiwyg/popup. To upload image click inside editor to the Image icon. Now you uploaded image, don't insert it, you already inserted it when you changed face_500.jpg to your image name.
geoIP and countries
You can use geoIP feature to display popup to visitors from specific countries. In your popup editor you will find this feature under Extra show conditions. This feature includes GeoLite2 data created by MaxMind, available from https://www.maxmind.com. To download the latest IP database, use this download link. Then upload it to your ftp under folder lib/internal/magebird/popup/MaxMind
GDPR and cookies
Our extension uses cookies to store information about user's activity such as which products user added to cart, cart subtotal, referral url, number of visited pages, etc. These cookies are used for case if you want to display popup based on user activity. These cookies are not associated with any personally identifiable information to avoid GDPR incompliance.
Product attribute show conditions
The Extension gives you option to show popup only on product pages if a product attribute matches your value (e.g. if the product price is higher than 100$, if color is green, ...). You will find field 'Product Attribute' inside tab 'Extra show conditions'. Write your_attribute_code=your_value. You can use the following comparison operators: =,!=,>,>=,<,. Use dobule comma (,,) to use more conditions. Use % to use match condition (see example the below) and use OR for or condition (see the below).
Examples:
Show popup on product page if price is equal or higher than 100 and if color is not yellow: price>=100,,color!=yellow
Show popup on product page if value for attribute color is empty: color=EMPTY
Show popup on product page if value for attribute color is NOT empty: color!=EMPTY
Show popup if sku contains "LZ": sku=%LZ%
Show popup if product sku contains "LZ" OR if product color is yellow: sku=%LZ%,,OR color=yellow
Showing product information inside popup
Showing product information is very easy. To display product information inside popup you need to insert variable {{productAttribute="attribute_code"}} inside popup editor. A list of product attribute codes can be found inside Stores->Attributes->Product.
Examples:
Show product name: {{productAttribute="name"}}
Show product price: {{productAttribute="price"}}
Show product image: <img src="{{productAttribute="small_image"}}" width="IMAGE WIDTH" />
You can even show information of product that has been added to cart. To display information about the product inside the cart use the same method, but use productCartAttribute instead of productAttribute. If there are more products inside the cart it will show information of the first product. Example:
Show product color: {{productCartAttribute="color"}}
ActiveCampaign extra fields and double opt-in
To add First and Last name into newsletter form and send it to ActiveCampaign follow the same instructions as for Mailchimp (see above). If you want to add any other extra field you need to add two fields:
1. Add hidden input field with name custom_field_name where value is your field identifier.
2. Add hidden input field with name custom_field_value where value will be user selection value.
You can find example in the file app/code/Magebird/Popup/view/frontend/template/widget/newsletter/newsletter/1_activecampaign.phtml
If you want to use double opt in you need to create first subscription form and choose for this subscription form to use double opt in. This form won't be displayed inside Magebird Popup newsletter form but it will just take dobule-opt in settings from it. Now you need to mention this form id inside newsletter form. To do that put inside file app/code/Magebird/Popup/view/frontend/template/widget/newsletter/your_template_number.phtml new hidden field with name form_id and value of your form id:
<input type="hidden" name="form_id" value="Your form id goes here" />
Ajax request and script magebirdpopup.php
Our extension uses ajax call to load popups. This is the only way to prevent cache issues. Calling a Magento controller for ajax calls can waste a lot of resources because it requires Magento initialization. Because of that we developed a custom script magebirdpopup.php which is used for all ajax calls. We reduced in this way spent resources for almost 500%.
In some cases the script magebirdpopup.php is not web accessible due server permission. To check if script is web accessible open www.yourdomain.com/magebirdpopup.php or www.yourdomain.com/pub/magebirdpopup.php and press ctrl+u. The first line of source code should look like this:
<script data-cfasync="false" type="text/javascript">
If you don't see this line but you see Page not found or other message please make sure that file magebirdpopup.php is inside Magento root folder and inside /pub directory. If you don't see it, download the extension from here and upload all files again. If the file is there, contact your server administrator and ask them to make script /magebirdpopup.php web accessible.
- Overview
- Screenshots
- FAQ, docs